
Tracking Footer Clicks with Google Tag Manager
Step-by-step guide to track footer link clicks using Google Tag Manager and GA4, with testing, custom events, and cross-site tips.
Footer clicks are often overlooked in analytics, but they reveal critical user behavior. If users scroll to the footer and click links like "Privacy Policy" or "Support", it shows intent. However, tracking these clicks in Google Analytics 4 (GA4) isn't automatic for internal links - you'll need Google Tag Manager (GTM) for custom setup.
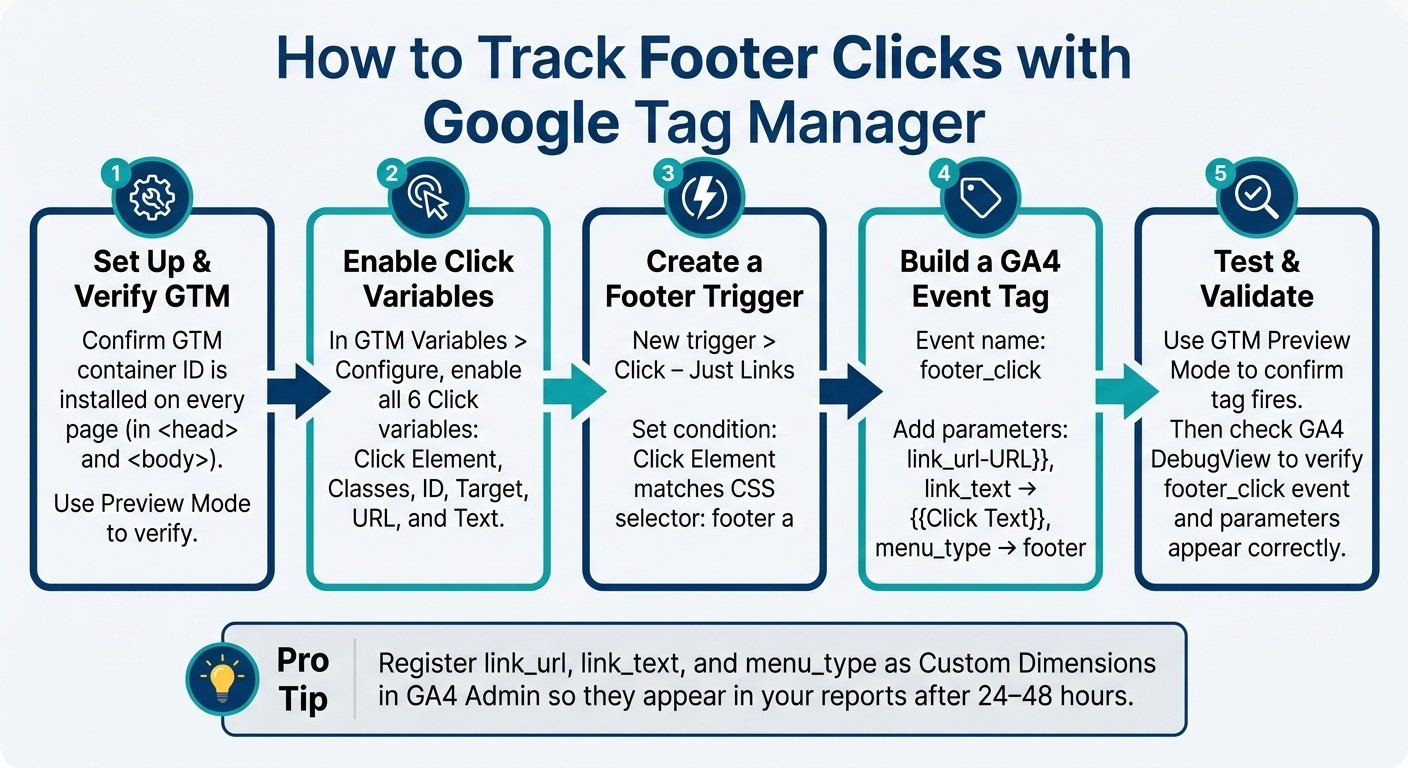
Here’s a simplified process:
Set Up GTM: Ensure GTM is installed sitewide and use Preview Mode to test configurations.
Enable Click Variables: Activate GTM's built-in click variables to capture data like link text and URL.
Create a Trigger: Configure a GTM trigger for footer-specific clicks using CSS selectors like
footer a.Build a GA4 Event Tag: Create a custom event (
footer_click) in GTM, passing parameters likelink_urlandlink_textto GA4.Test in Preview Mode: Validate your setup in GTM and GA4 DebugView to ensure accurate tracking.
Managing multiple sites? Tools like 1Footer standardize footers across websites, simplifying GTM setup and ensuring consistent tracking.
Footer click data can help you understand user intent, improve navigation, and optimize site performance. By tracking these interactions, you gain actionable insights into how visitors engage with your site.
How to Track Footer Clicks with Google Tag Manager (GTM)
Link click tracking with Google Tag Manager || Track links with GTM
Preparing Your Tools for Footer Click Tracking
Before diving into creating GTM triggers, make sure your tools are correctly set up and functioning.
Verify Google Tag Manager Is Installed
Google Tag Manager (GTM) must be active on every page where your footer is displayed. To confirm its installation, you can use GTM Preview Mode or manually check the page source by searching for your container ID (e.g., GTM-XXXXXX).
As Julius Fedorovicius, Founder of Analytics Mania, explains:
"If you don't see the GTM container ID in that row, it means that GTM has not been installed properly on a website and you (or your developers) should check the setup."
Ensure the GTM snippet is correctly placed - this includes the <script> tag in the <head> and the <noscript> tag immediately after the opening <body> tag. These snippets must be consistent across all pages. If you're working with multiple domains, make sure they all use the same GTM container ID. Mixing container IDs across domains can lead to fragmented data, making analysis more difficult.
Set Up Google Analytics 4

To track footer clicks, you need an active Google Analytics 4 (GA4) property. If you already have one, go to Admin > Data Streams, select your stream, and copy the Measurement ID (it begins with G-).
One critical adjustment to make: GA4's default data retention is set to just 2 months. To extend this, navigate to Admin > Data Settings > Data Retention and change it to 14 months. Without this change, you'll lose historical data before you can fully analyze trends.
Dave Ashworth highlights an important limitation of GA4:
"Out of the box, GA4 doesn't actually track internal link clicks – the default 'click' event only tracks external link clicks."
This underscores the need for a custom GTM setup, which will be covered in the next steps.
Enable GTM Preview Mode
GTM Preview Mode is an essential testing tool. Use it to ensure your tags and triggers work as intended before making changes live.
To activate Preview Mode, open your GTM workspace and click Preview in the top-right corner. Enter your website URL, and a Tag Assistant window will open alongside your site. This tool shows real-time events and clicks in a timeline, helping you identify and fix any misconfigured triggers.
Once your tools are set up and verified, you're ready to move on to configuring footer click tracking in GTM.
Setting Up Footer Link Click Tracking in GTM
Once your tools are in place, the next step is to configure Google Tag Manager (GTM) to track clicks on footer links. This involves enabling click variables, creating a footer link trigger, and setting up a GA4 event tag.
Enable Click Variables in GTM
By default, GTM's click variables are turned off. Without enabling these, GTM can't collect details about a click, such as the link's destination or its visible text.
Here's how to enable them:
Navigate to the Variables section in your GTM workspace.
Click Configure in the Built-in Variables panel.
Scroll to the Clicks category and check all six options: Click Element, Click Classes, Click ID, Click Target, Click URL, and Click Text.
For tracking footer links, the most relevant variables are Click URL, Click Text, and Click Classes. These provide insights into the link's destination, its visible label, and any specific styling tied to the footer. Once enabled, use GTM's Preview Mode to test a footer link and confirm the data under the Variables tab.
Create a Footer Link Click Trigger
To set up a trigger in GTM:
Examine the HTML structure of a footer link to identify unique attributes like
class,id, or whether it's nested within a<footer>tag.Create a new trigger and select Click – Just Links as the Trigger Type. If your footer links are styled using
<div>or<button>elements, choose All Elements instead.Configure the trigger to fire only on specific link clicks.
Add a condition by selecting Click Element, using the operator matches CSS selector, and entering
footer aas the value. This ensures the trigger captures links within the footer.Enable Check Validation so the trigger only fires for valid link clicks.
Build a GA4 Event Tag for Footer Clicks
Next, create a GA4 Event tag using your GA4 Measurement ID (G- ID), which should be stored in a Constant variable.
Set the Event Name to something descriptive, like
footer_click.Add parameters to capture useful details:
Parameter Name | Value | Purpose |
|---|---|---|
|
| Shows where the link directs (internal or external) |
|
| Displays the visible label on the link (e.g., "Privacy Policy") |
|
| Differentiates footer interactions from other navigation clicks |
Assign the previously created footer trigger to this tag, then save it. If you use custom parameters like link_text, make sure to register them as Custom Dimensions in the GA4 Admin panel so they appear in your reports.
As Julius Fedorovicius, Founder of Analytics Mania, explains:
"Enhanced Measurement is a fantastic starting point... but it will not track clicks on internal elements like... a tab in a navigation menu."
This process ensures you capture detailed data about user interactions with footer links, giving you a clearer picture of how users navigate your site.
Testing and Validating Footer Click Tracking
Once you've configured your GTM trigger and tag, the next step is to ensure they work as intended. Skipping this step could mean your tags won't fire properly, leading to incomplete data collection. Here's how to test and validate your setup effectively. For more insights on optimizing your site's bottom navigation, check out the 1Footer Blog.
Test Trigger and Tag Firing in GTM Preview Mode
Start by clicking the Preview button in the top-right corner of your GTM workspace. Enter your website's URL and hit Connect. This will open your site in a new browser window linked to the debugger, while the Tag Assistant tab displays the debug console. To make testing easier, arrange both windows side by side so you can monitor footer link clicks in real time.
When you click on a footer link, a new "Link Click" event should appear in the Event Timeline on the left side of Tag Assistant. Select this specific event (avoid using the "Summary" view) and check if the footer_click tag shows up under "Tags Fired." Julius Fedorovicius, Founder of Analytics Mania, offers this advice:
"Always select the event in the event stream first and only then click the tag to debug. Do not debug individual tags while having a Summary selected."
If the tag is listed under "Tags Not Fired," click on it to review the failed trigger condition, marked by a red "X." Then, go to the Variables tab to inspect the values for Click URL and Click Text. If either of these values shows as undefined, it likely means that no Click trigger is active in your GTM container.
Once you've confirmed the tag fires correctly in GTM Preview, you're ready to move on to GA4 DebugView for further validation.
Validate Events in GA4 DebugView
After verifying your tag in GTM, open GA4 DebugView to review the event data. Navigate to Admin > Data Display > DebugView. Since you're using GTM Preview mode, GA4 will automatically receive a debug signal, and you'll see data populate in DebugView in real time - no additional setup required.
Locate your footer_click event in the DebugView timeline. Click on the event to expand its details and confirm that the custom parameters - link_url, link_text, and menu_type - are populated with the correct values. Keep in mind that GA4 treats event and parameter names as case-sensitive, so double-check their formatting.
If your custom parameters don’t show up in standard GA4 reports after 24–48 hours, make sure you've registered them as Custom Dimensions in GA4. To do this, go to Admin > Custom Definitions > Create Custom Dimension and add them there. This step ensures your data appears correctly in future reports.
Analyzing Footer Click Data in GA4
Once your tags are firing and custom dimensions are set up, you can start digging into GA4 reports to extract actionable insights.
Find Footer Click Events in GA4 Reports
To track the footer_click event, head to Reports > Engagement > Events in GA4. This will show you the total event count. For a more detailed breakdown, use the Explore tab. Build a Free-form exploration and include dimensions like Event name, Link text, and Page path. This setup allows you to pinpoint which footer links are being clicked and on which pages. To focus exclusively on footer data, apply a filter where the menu_type custom dimension equals footer or footer_menu.
Julius Fedorovicius, Founder of Analytics Mania, highlights the importance of such insights:
"By understanding what your visitors are clicking on, you can start to answer business questions. For example, is anyone actually using the main navigation links, or do they prefer using the search bar?"
Keep in mind that new events and custom dimensions may take 24 to 48 hours to appear in GA4 reports. If your Exploration looks empty right after setup, give it some time to populate. Once the data is available, you can dive deeper to see how footer interactions vary across your sites.
Compare Footer Performance Across Multiple Sites
If you're managing footers for multiple websites - whether they're on different domains or subdomains - you can add Page hostname as a dimension in your Exploration. Use this as a row and nest Link text beneath it. This structure helps you identify which footer links are most popular on each site. A consistent footer design across all properties, as supported by tools like 1Footer, makes it easier to assess how changes to the footer impact user engagement across multiple sites.
Dave Ashworth, a Freelance SEO and Website Optimization Consultant, emphasizes the value of tracking this data:
"one of the most insightful user behaviour tracking enhancements you can make."
For best results, ensure your GA4 data retention settings are configured correctly, following the instructions provided earlier. This will help you maintain access to detailed historical data for ongoing analysis.
Conclusion: Setting Up Multi-Site Footer Tracking
To track footer clicks using Google Tag Manager (GTM), you'll need to follow a few key steps: enable click variables, set up a trigger specifically for the footer, create a GA4 event tag with the right parameters, and test everything thoroughly in Preview Mode and DebugView. This method helps ensure your data is accurate across all your sites.
One of the toughest hurdles for teams managing multiple sites is keeping the footer HTML consistent across domains. Why does this matter? If one site uses a <footer> tag while another relies on a generic <div>, GTM's ability to detect and measure interactions can break down. This inconsistency leads to incomplete or unreliable data. As Margub Alam, an Advanced GTM Specialist, explains:
"Identifying where interactions occur on your website - whether in the header, footer, or body - provides actionable insights for optimizing user experience."
This is where 1Footer steps in to simplify your workflow. By allowing you to manage footer content from a centralized dashboard and push updates across all your sites, 1Footer ensures your HTML structure remains consistent. This means GTM triggers work as expected, even when site updates occur. Daniel Sinewe, an Indie Hacker, highlights the value of this tool: "1Footer exists because I got tired of manually updating footers across all my indie projects every time I launched something new." In essence, GTM ensures accurate tracking, while 1Footer guarantees the consistency needed to make that tracking reliable at scale.
FAQs
Why doesn’t GA4 track footer link clicks automatically?
Google Analytics 4 (GA4) comes with a handy Enhanced Measurement feature that automatically tracks outbound link clicks and file downloads. However, it doesn't monitor internal navigation or clicks on footer links by default. To capture these interactions, you'll need to set up custom triggers and tags using Google Tag Manager.
For teams managing multiple sites, tools like 1Footer can simplify the process. It ensures footer link updates stay consistent across all sites while keeping the HTML crawlable - essential for accurate tracking and SEO.
How do I track only footer links (not all site links) in GTM?
If you want to monitor only footer link clicks in Google Tag Manager, start by enabling all the built-in click variables. These include Click Classes, Click ID, and Click URL, which you can activate in the Variables menu.
Next, create a Just Links trigger. Set it to fire on Some Link Clicks rather than all clicks. To make sure the trigger activates only for footer links, use a condition like Click Classes contains 'footer-link'. Alternatively, you can use a parent element selector to target links within the footer specifically. This approach ensures your tag fires exclusively for clicks on footer links.
Why aren’t my footer_click parameters showing in GA4 reports?
If you’re not seeing footer_click parameters in your Google Analytics 4 (GA4) reports, it’s probably because they haven’t been set up as custom dimensions. GA4 doesn’t automatically show custom event parameters.
To resolve this, navigate to Admin > Custom Definitions in your GA4 account and create a new Custom Dimension. Make sure the Event Parameter name matches exactly what you’ve set up in Google Tag Manager.
Keep in mind: data collection isn’t retroactive, and it may take up to 24 hours for the data to appear in your reports.


